Surfboard Benches
Jeff and BJ put together these awesome surfboard chairs for Ubuntu backpackers in Jeffrey's bay- they build frames out of wood, varnished them and secured pieces of old broken surfboards and voila- a surfboard chair! Nice one team :)


Raised Vegetable Beds
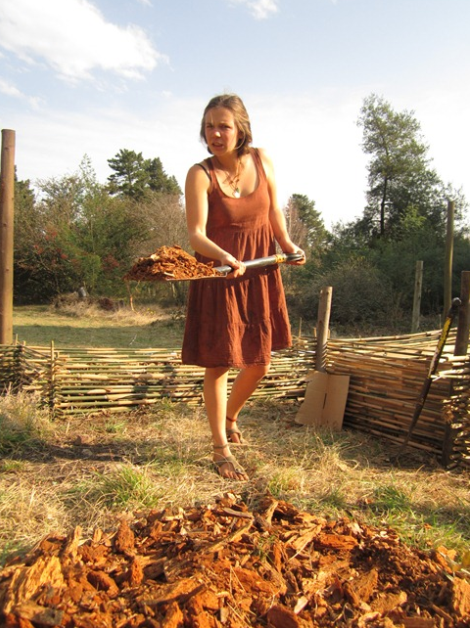
This week we put in a lot of elbow grease setting up our new raised vegetable beds. Made of wattle and bamboo, with no nails or screws or nada- all of our materials were locally sourced and free. So often we as humans feel we have a 'right' to waste and become lazy- this is NOT cool. Take a look around you and use the natural resources our beautiful planet provides us with, and do something in turn to give back. So, after making our beds we started gathering the materials with which to fill them: dried leaves from around the property, horse and cow manure from our neeeeiggghbours (ha ha), wood ash, dried wood chips, and a combination of sandy soil and rich fertile soil. Take a look at how it all came together:


Bamboo Pipes
We pulled together a team effort on making bamboo pipes to sell at the Christmas in July market- and it was a great success! We harvested the bamboo here on the mountain, and the guys put the pipes together while I decorated them. A huge thanks goes to Shireen and Sarel for allowing us to make use of their beautiful studio here at HeArtspace. Thank you for your inspiration and creative energy, and for always making us feel at home. Here's a look at the products:


29.06.2012
Ryan, Manie and Pule have been working hard these last few days, designing and assembling the chicken coop, so that it's ready for the arrival of their 3 chickens this weekend. We have started to clear a lot of the wattle on the property for firewood, building and compost.


26.06.2012 - planting day!
The main focus today was getting all the seeds into the prepared soil. We planted out just over 500 heirloom seeds, including: 7 types of tomatoes, 9 different lettuces, white and pink egyptian garlic tabasco, habanero and black pearl chillies, culinary and medicinal herbs such as echinacea, lemon balm, cinnamon basil, tarragon, oregano, and more. we watered them (with the help of little amier and kayla) and placed on the shade coverings. The guys started putting together the foundations of the chicken coop, using recycled wood found on the property.


25.06.2012
Today we began by playing with the pH levels of the soil, creating certain amounts of the different levels needed for the various seeds to plant. We filled all the seedling trays with soil, labelled them, and arranged them on the nursery table. Mani, Ryan, Pule and Spooki cleaned out the remains of the old chicken coop and began planning new designs to start building tomorrow.


23.06.2012 - Getting started
Today we got a few things sorted: we built a new earthworm farm (pretty much like the one in our DIY post), began preparing the seedling mix for the nursery, set up the indoor nursery, sorted all the trays and placed and built shade coverings. here are a few pics:


Tunnels
There's been a lot of heavy elbow grease going on next door- headed by Louis, Jeff, the MyLife boys and a few extra hands have been working hard the past few days putting up the first of Louis' vegetable tunnels. Here's a sequence of photographs taken during the construction:


Dream Catchers
Jeff and BJ put together these awesome surfboard chairs for Ubuntu backpackers in Jeffrey's bay- they build frames out of wood, varnished them and secured pieces of old broken surfboards and voila- a surfboard chair! Nice one team :)


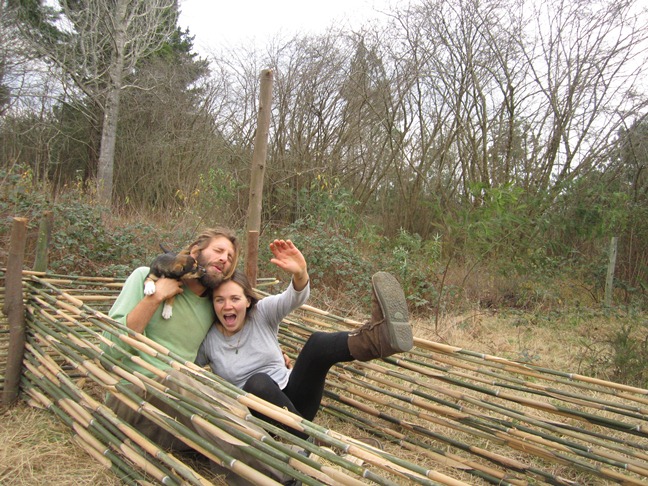
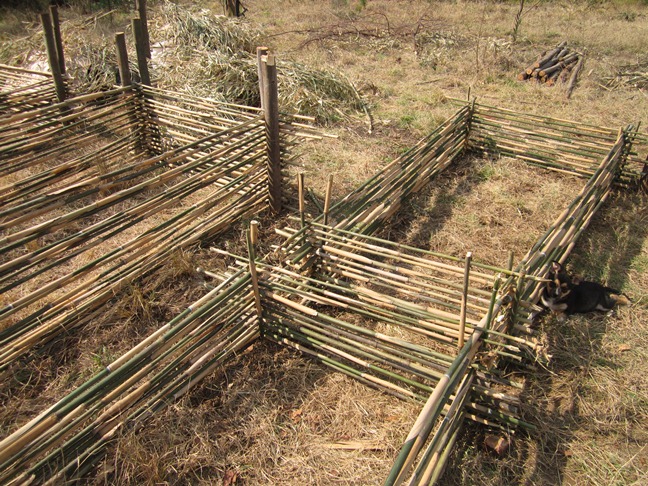
Raised Vegetable Beds
This week we put in a lot of elbow grease setting up our new raised vegetable beds. Made of wattle and bamboo, with no nails or screws or nada- all of our materials were locally sourced and free. So often we as humans feel we have a 'right' to waste and become lazy- this is NOT cool. Take a look around you and use the natural resources our beautiful planet provides us with, and do something in turn to give back. So, after making our beds we started gathering the materials with which to fill them: dried leaves from around the property, horse and cow manure from our neeeeiggghbours (ha ha), wood ash, dried wood chips, and a combination of sandy soil and rich fertile soil. Take a look at how it all came together:


Bamboo Pipes
We pulled together a team effort on making bamboo pipes to sell at the Christmas in July market- and it was a great success! We harvested the bamboo here on the mountain, and the guys put the pipes together while I decorated them. A huge thanks goes to Shireen and Sarel for allowing us to make use of their beautiful studio here at HeArtspace. Thank you for your inspiration and creative energy, and for always making us feel at home. Here's a look at the products:


29.06.2012
Ryan, Manie and Pule have been working hard these last few days, designing and assembling the chicken coop, so that it's ready for the arrival of their 3 chickens this weekend. We have started to clear a lot of the wattle on the property for firewood, building and compost.


26.06.2012 - planting day!
The main focus today was getting all the seeds into the prepared soil. We planted out just over 500 heirloom seeds, including: 7 types of tomatoes, 9 different lettuces, white and pink egyptian garlic tabasco, habanero and black pearl chillies, culinary and medicinal herbs such as echinacea, lemon balm, cinnamon basil, tarragon, oregano, and more. we watered them (with the help of little amier and kayla) and placed on the shade coverings. The guys started putting together the foundations of the chicken coop, using recycled wood found on the property.


Today we began by playing with the pH levels of the soil, creating certain amounts of the different levels needed for the various seeds to plant. We filled all the seedling trays with soil, labelled them, and arranged them on the nursery table. Mani, Ryan, Pule and Spooki cleaned out the remains of the old chicken coop and began planning new designs to start building tomorrow.


23.06.2012 - Getting started
Today we got a few things sorted: we built a new earthworm farm (pretty much like the one in our DIY post), began preparing the seedling mix for the nursery, set up the indoor nursery, sorted all the trays and placed and built shade coverings. here are a few pics:


Tunnels
There's been a lot of heavy elbow grease going on next door- headed by Louis, Jeff, the MyLife boys and a few extra hands have been working hard the past few days putting up the first of Louis' vegetable tunnels. Here's a sequence of photographs taken during the construction:


Dream Catchers
Many hours have been spent weaving, knotting, cutting and
wrapping away on the dream catchers, and they turned out really well. Yesterday
we went from having 7 beautiful creations on the wall, to none... But this is a
good thing because that means we sold them! So its time to start again and make
some more. We’re experimenting with techniques and different shapes etc, so
watch this space for a follow up!


DIY vertical gardens
VERTICAL GARDENS
Vertical gardens come in many shapes and sizes, and they are made of either bought matrial or the inexpensive ideas you come up with using products you would normally recycle. In other words, lets upcycle before recycling!
A couple of of things to keep in mind when making a vertical garden: what and where will the best type of plants grow
- Should the water free flow down the vertical garden between containers, along something, or in it (piping, my case bamboo)
- the amount of water the first container gets compared to the last
- The size of the indivual containers vs which plant to plant in them
- Like us, plants have a type of social structure (companion planting)
- Water flow and how fast it can move
- How to collect excess water
One of the major problems with most vertical gardens is water efficiency. Nobody likes a leaking tap, and the same should be said about a vertical garden. In a general law theres office theres never no parameters to anything. With your ‘efficient’ vertical garden , having tomotoes growing inside in winter is a possibility depending on the conditions: amount of light and warmth inside. These effects would be similiar to a greenhouse. In a lot of ways then efficiency allows for more variation in the situated environment i.e back of kitchen door versus open wall in the kitchen which gets light. It also allows mobility for maintaining the right amount of sunlight , and protection from wind and rain, etc. Artistic influences enhance the aesthetics of your vertical garden: mini waterfall sounds, web weaving using nails to draw the strings out further than the containers, zig zag patterns along the sides, thinner string feeding off the thick string allowing to feed all plants at the same time and all the string to be beaming with water reflecting sunlight all at once woud be great. I’m sure with creative thought anything is possible.
So these models I’ve used are protypes and are to use at your disposal(In a free world there shouldnt be any copyright) to create your own ideas, have fun and enjoy your freedom.


Vertical garden growing things
Here is a list of things one could grow in a vertical garden
Peppers are always a good thing to grow. Depending on what you want, there is some awesome stuff out there such as: Peppadews, Califorian sweet peppers, your classic big green pepper, habenero, Jalapeno, ornamental chillis, bushman pepper/chilli and tabasco chilli!
Living seeds (see links on the right) have a great variety of french and dwarf beans. Provider bush beans, Roquefort, kentucky wonder runners are great choices.
Tomatoes are a great thing to grow and as Greenpop pointed out, there are many different types. Some I am familiar with are cherry tomotoes (the yellow and the red one’s are nice for spring), Roma tomotoes which are the best type for pickling. And then there’s Blondkopfchen tomatoes, another yellow variation which I am planning on growing in the future.
Herbs to use for culinary purposes(Coriander,marjoram, rosemary, basil, mint, dill) aid in attracting bees and other polinators, as well as those for medicanal pruposes, house detergent’s, insect repellent such as mozzie’s and flys. These are all good things to plant in your vertical garden. You’ll find one plant may have overlapping catogorys and if space is the limitation, these should be the ones you’re looking for.
Leafy crops in the lateral milk conatiner work well ie lettuce, spinach, bloody sorrel, rocket, wild rocket
Fruit such as strawberries, blackberries and gooseberries would be good contenders for a spot on the wall.DIY earthworm farm
getting started:
3 plastic storage boxes - these are going to be stacked on top of each other to create the farm tower. set one box with its lid aside. remove the lids from the remaining two boxes, and turn upside down. where the lid clicks onto the bottom half of the box, cut off the little pieces. this enables the box to sit flat on top of the upturned lid. (this is tricky to explain). now, you need to drill holes right through the bottom of both boxes and the lids underneath them. this will leave you with 2 boxes and 2 lids with holes in them; as well as one box and lid still as you bought it. kapeesh? eish? keep going.. now place the uninjured box on a surface, then on top of that, one of the drilled lids, upside down. then on top of that, one of the drilled boxes.. then another drilled lid, then another drilled box. and finally on top of that- the 'normal' lid.
I'm pretty sure there's a better way to explain this, but it has escaped me. maybe take a look at the final picture of the farm to make sense of the stacking tower.
time to make the farm! this is done by layering a variety of garden goodness...
step 1:
cut an old piece of material and place it in the middle box, covering the holes. (we used the material from an old t-shirt). this will prevent the earthworms from falling through the holes and drowning in their wee!
step 2:
sprinkle on top, some dried foliage such as small crunchy leaves and dried flowers/grass cuttings.


step 3:
on top of the dried leaf layer, place some nitrogen rich soil or dry cow/horse poop. (NOT wet)


step 4:
next, add some organic waste such as vegetable skins and trimmings. it's a good idea to collect all your organic waste in a large sealable bucket, as you will need this for feeding your worms in the days to come.


step 5:
on top of the veggie layer, sprinkle some wood ash (this can be collected from old fires or braais). the ash helps to neutralise the contents with its alkaline properties. It also adds potassium and phosphorus which are vital for good vermocompost.


step 6:
add another layer of dried foliage, as done in step 2.

step 7:
it's worm time! add the worms you have, including the goodness they come in. this will make them feel a little more at home and less stressed by the move.


step 8:
yet another layer of the dried stuff from step 2 and 6.
step 9:
using a watering can, sprinkle over 400-500ml of 15:1 water to worm tea mix. this help to make the contents a bit more moist after having added all the dry bits. it also makes the worms happy :)

step 10: place the container tower together and tuck away in a shady cool corner of your garden.

HAPPY FARMING!